
Roof Flashing & Chimney Leaks: Where Roofs Fail
How roof flashing works, why flashing and chimney penetrations are the most common leak sources, and what to look for when these areas fail.
Key Editorial Takeaways
- ✓Most residential roof leaks are flashing failures at penetrations and transitions — chimneys, plumbing vents, skylights, valleys, and roof-to-wall intersections — not holes in the middle of shingles.
- ✓Chimney flashing involves multiple components (step, base, counter-flashing, and sometimes a cricket/saddle) and is the most complex and most commonly failed flashing detail.
- ✓Rubber pipe boots degrade from UV exposure over 10–15 years and are one of the most common and easily missed leak sources — a tiny crack can cause a persistent ceiling leak.
- ✓Flashing fails from age/weathering, improper installation (missing step flashing, improper layering, insufficient overlap), thermal movement, and storm damage.
- ✓When a roof is replaced, all flashing should be replaced — reusing old flashing is a common shortcut that causes premature leaks; chimney flashing replacement is particularly important and often skipped.
This article is part of our comprehensive guide: Roof Repair vs. Replacement: How to Decide What Your Home Needs
Answer First: Most Roof Leaks Are Flashing Failures
When a roof leaks, the problem is rarely a hole in the middle of a shingle. Most residential roof leaks originate at penetrations and transitions — the places where the roof plane is interrupted by a chimney, vent pipe, skylight, valley, or wall intersection. These areas are sealed by flashing, and flashing failure is the most common cause of residential roof leaks.
The Asphalt Roofing Manufacturers Association (ARMA) identifies flashing as a critical component of a weather-resistant roof system, and the International Residential Code (IRC) establishes specific flashing requirements at all roof penetrations and intersections. Understanding where flashing is, what it does, and how it fails helps homeowners understand why most leaks are not "the roof" failing but a specific transition point failing.
For the broader context of roof leaks, see our common roof leak sources guide.
What Is Roof Flashing?
Flashing is the thin metal (or in some cases, membrane) material installed at roof transitions, penetrations, and edges to direct water away from vulnerable seams and joints. Wherever the roof plane is interrupted — by a wall, a chimney, a pipe, a skylight, a valley — flashing creates a waterproof bridge between the roof surface and the penetrating element.
Common Flashing Materials
- Galvanized steel** — durable and common, but can rust if the coating is damaged
- Aluminum** — lightweight, does not rust, common in residential flashing
- Copper** — premium, very durable, develops a patina; often used on high-end roofs and historic homes
- Lead** — traditionally used for pipe boot flashing because it is easily formed around pipe shapes; some regions restrict lead use
- Membrane flashing (peel-and-stick)** — self-adhering rubberized asphalt membrane used as underlayment at valleys, eaves, and around penetrations for an additional water barrier
Where Flashing Is Installed (and Where Leaks Start)
1. Chimneys
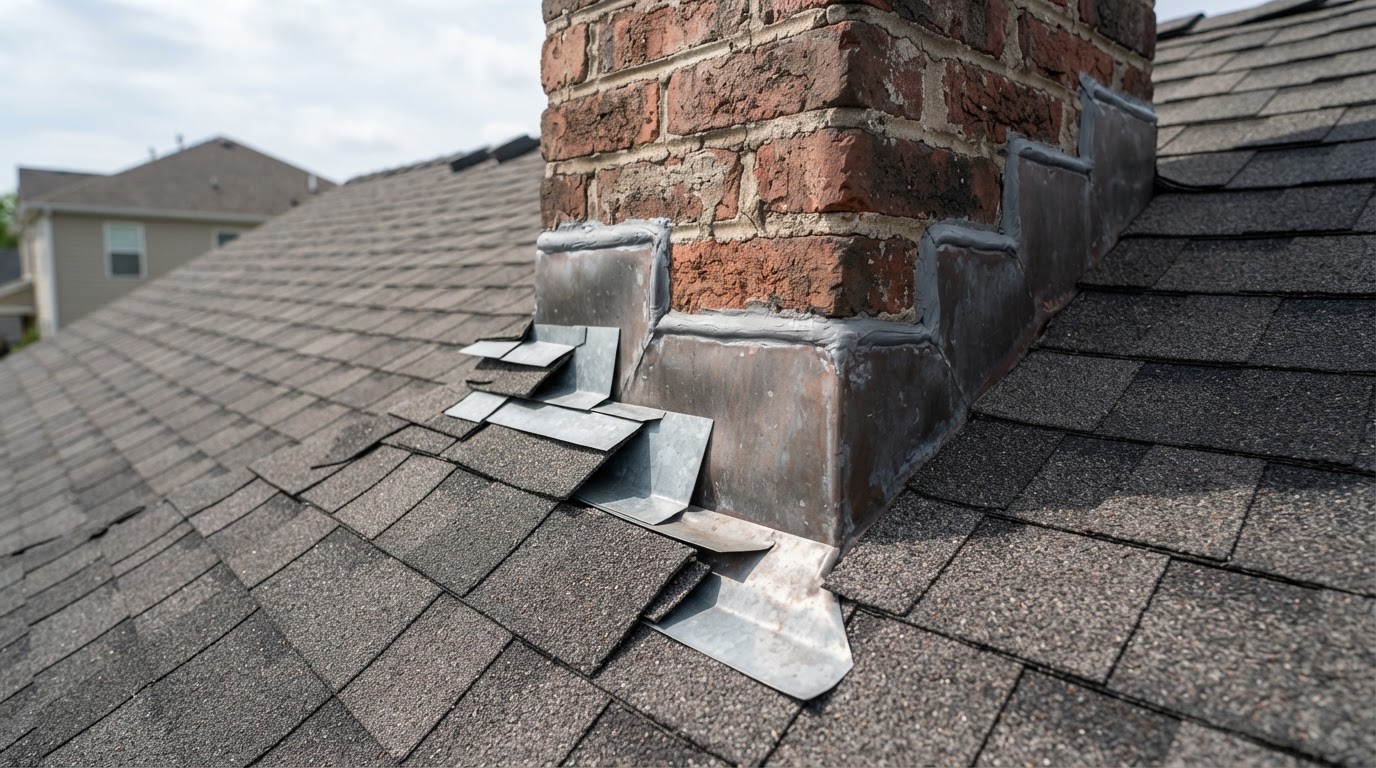
Chimneys are the largest and most complex roof penetration, and chimney flashing is the most common source of chimney-area leaks. Chimney flashing involves multiple components:
- Step flashing** — L-shaped pieces of metal woven into the shingle courses up the sides of the chimney
- Base flashing** — the bottom piece that seals the intersection at the chimney base
- Counter-flashing** — metal embedded into the mortar joints of the chimney and folded down over the step flashing, creating a two-layer seal
- Saddle (cricket) flashing** — on wide chimneys, a small peaked structure (cricket) behind the chimney diverts water around it rather than pooling against it
Why chimneys leak: The mortar joints where counter-flashing is embedded deteriorate over time, allowing water behind the flashing. Step flashing can lift, separate, or corrode. The chimney crown (the concrete top) can crack, allowing water into the chimney structure itself — this is a chimney problem, not a roof problem, but it causes interior leaks that homeowners often attribute to the roof.
2. Plumbing Vent Pipes (Pipe Boots)
Every plumbing vent pipe that exits the roof is a penetration that must be flashed. This is typically done with a pipe boot — a rubber or neoprene gasket fitted over the pipe and integrated with the shingles.
Why pipe boots leak: The rubber/neoprene gasket degrades from UV exposure over time (typically 10–15 years), cracking and allowing water to run down the pipe into the attic. This is one of the most common and easily missed leak sources — a tiny crack in a pipe boot gasket can cause a persistent ceiling leak.
3. Skylights
Skylights are large penetrations that require careful flashing on all four sides — head (top), sill (bottom), and two jambs (sides). Skylight flashing must integrate with the shingles and the skylight frame.
Why skylights leak: Improper installation, deteriorated sealant, or failed flashing at the head or sides. Some skylight leaks are actually condensation or failed skylight seals (a skylight problem, not a roof problem).
4. Valleys
Roof valleys — where two roof planes meet — handle the highest volume of water on the roof. Valley flashing (metal or membrane) must be installed correctly to channel this concentrated flow.
Why valleys leak: Improper installation, debris accumulation (leaves and debris collect in valleys), or corrosion of the metal valley flashing. Open valleys (where the metal is visible) are easier to inspect; closed valleys (where shingles cover the valley) hide the metal but can still fail if water gets under the shingle edges.
5. Roof-to-Wall Intersections
Where a roof meets a vertical wall (such as a dormer or a second-story wall), step flashing and counter-flashing must bridge the intersection. Water running down the wall must be directed out onto the roof surface, not behind the wall.
Why these leak: Missing or improper step flashing, deteriorated counter-flashing, or siding that does not properly overlap the flashing.
6. Drip Edge (Eaves and Rakes)
Drip edge flashing is installed at the roof edges (eaves and rakes) to direct water away from the fascia and into the gutter. The IRC requires drip edge at eaves and rakes (Section R905.2.8.5).
Why drip edge matters: Without drip edge, water can wick back under the shingles and saturate the roof deck and fascia — a common cause of fascia rot. See our gutter and downspout guide for how drip edge and gutters work together.
7. Roof Vents and HVAC Penetrations
Ridge vents, box vents, power vents, and HVAC exhaust penetrations each require proper flashing and sealing. These are smaller penetrations but are common leak sources when sealant fails or flashing is improperly installed.
Signs of Flashing Failure
- Water stains on ceilings or walls** near a chimney, plumbing vent, skylight, or valley — the location of the stain often indicates which penetration is leaking
- Rust or corrosion** on visible metal flashing
- Lifted, loose, or missing** flashing pieces
- Cracked or deteriorated sealant** (caulk) around penetrations — sealant is a secondary seal, not the primary waterproofing, but its failure signals aging
- Deteriorated mortar** on a chimney — may indicate the counter-flashing seal is compromised
- Daylight visible** around a penetration from inside the attic
- Granule accumulation** in valleys — debris collecting in a valley signals a maintenance need
For how to identify these and other leak signs, see our signs you need a new roof guide and common roof leak sources guide.
Why Flashing Fails
Age and Weathering
Flashing materials degrade over time. Rubber pipe boots crack from UV exposure. Metal flashing corrodes (especially galvanized steel if the coating is damaged). Sealant dries, cracks, and loses adhesion. ARMA and roofing professionals recognize 15–20 years as a typical service life for flashing components on an asphalt shingle roof.
Improper Installation
Flashing is only as good as its installation. Common installation errors include:
- Missing step flashing** — some contractors shortcut by using only sealant instead of properly woven step flashing
- Improper layering** — flashing must be layered so water always sheds over, never under, the next piece
- Nail placement** — nails in the wrong location can create leak paths
- Insufficient overlap** — flashing pieces must overlap enough to shed water
- Missing counter-flashing** — without counter-flashing embedded in the mortar, chimney flashing relies on sealant alone
Thermal Movement
Roofing materials expand and contract with temperature changes. Over time, this movement can work flashing loose, separate sealant joints, and create gaps — particularly at large penetrations like chimneys.
Storm Damage
High winds can lift flashing. Hail can dent or crack metal flashing and pipe boots. After any severe storm, flashing should be inspected along with the shingles. See our storm and hail damage guide.
Flashing and Roof Replacement
When a roof is replaced, the flashing should also be replaced — not reused. Reusing old flashing is a common shortcut that leads to premature leaks on an otherwise new roof. The IRC and manufacturer installation instructions require new flashing with a new roof. See our roof replacement process guide and roofing permits guide.
Chimney flashing replacement is particularly important — and particularly often skipped. A roof replacement that does not include new chimney flashing is a red flag. For how to vet a contractor on this, see our choosing a roofing contractor guide.
A Note on Sources
This guide draws on Asphalt Roofing Manufacturers Association (ARMA) technical bulletins on flashing, International Residential Code (IRC) flashing requirements (Sections R905.2.8, R903.2), and National Roofing Contractors Association (NRCA) installation guidelines. Specific flashing requirements vary by roof type, material, and jurisdiction — always confirm with your contractor and local building department.
Frequently Asked Questions
Why does my roof leak around the chimney?
Chimney leaks are usually flashing failures. Chimney flashing involves step flashing (woven into the shingles), base flashing, and counter-flashing (embedded in the mortar joints). The mortar deteriorates over time, allowing water behind the flashing. The chimney crown (concrete top) can also crack, allowing water into the chimney structure. A chimney-area leak requires a professional to determine whether it is a flashing or a chimney masonry problem.
What is roof flashing and why is it important?
Flashing is thin metal or membrane material installed at roof transitions, penetrations, and edges to direct water away from vulnerable seams. Wherever the roof is interrupted — by a chimney, pipe, skylight, valley, or wall — flashing creates a waterproof bridge. The ARMA identifies flashing as a critical component of a weather-resistant roof system, and most residential roof leaks are flashing failures, not shingle failures.
How long does roof flashing last?
Flashing components typically last 15–20 years on an asphalt shingle roof. Rubber pipe boots degrade from UV exposure over 10–15 years. Metal flashing corrodes over time, especially galvanized steel if the coating is damaged. Sealant (caulk) used as a secondary seal dries and cracks sooner. When a roof is replaced, all flashing should be replaced rather than reused.
Should flashing be replaced when I get a new roof?
Yes. Reusing old flashing is a common shortcut that leads to premature leaks on an otherwise new roof. The IRC and manufacturer installation instructions require new flashing with a new roof. Chimney flashing replacement is particularly important — and particularly often skipped. A roof replacement estimate that does not include new flashing, especially chimney flashing, is a red flag.
What are the signs of flashing failure?
Signs include water stains on ceilings or walls near a chimney, vent, skylight, or valley; rust or corrosion on visible metal flashing; lifted, loose, or missing flashing pieces; cracked or deteriorated sealant around penetrations; deteriorated chimney mortar; daylight visible around a penetration from inside the attic; and granule or debris accumulation in valleys.
Cited Research Sources & References
- Asphalt Roofing Manufacturers Association (ARMA) — Flashing Technical BulletinsView Source
- International Code Council — IRC Flashing Requirements (R905.2.8, R903.2)View Source
- National Roofing Contractors Association (NRCA) — Installation GuidelinesView Source