
How to Find a Roof Leak: A Step-by-Step Homeowner Detection Guide
A homeowner's guide to tracing a roof leak from the interior stain to the source — why water appears far from the entry point, attic inspection techniques, common leak locations, and when to stop and call a professional.
Key Editorial Takeaways
- ✓A roof leak's entry point is almost never directly above the visible interior stain — water travels along underlayment, decking, and rafters before dripping, often several feet from where it entered.
- ✓The most reliable detection method is to enter the attic during or after rain with a flashlight, locate the wet area on the underside of the deck, and trace the water trail upward to the entry point.
- ✓The most common leak locations are plumbing vent boots, flashing around chimneys and walls, roof valleys, skylights, and damaged or missing shingles.
- ✓A controlled hose test — soaking one roof section at a time while watching the attic — can isolate a leak that is not active during your inspection.
- ✓Stop and call a professional immediately if the leak is active and significant, the deck is sagging, mold is present, the leak is near electrical wiring, or multiple leaks are appearing.
This article is part of our comprehensive guide: Roof Repair vs. Replacement: How to Decide What Your Home Needs
Answer First: How Do You Find a Roof Leak?
Finding a roof leak means tracing the water backward from the interior stain to the point where water is entering the roof system — and the entry point is almost never directly above the visible stain. Water travels along rafters, across decking, down roof underlayment, and along the path of least resistance before it appears on a ceiling or wall. The most reliable method is to go into the attic during or immediately after rain with a flashlight, locate the wet area on the underside of the roof deck, and trace it upward to the entry point.
The National Roofing Contractors Association (NRCA) recommends that homeowners inspect their roofs and attics regularly and after storms. This guide translates that into a step-by-step leak-detection process you can follow safely from inside the home.
For what to do once you have an active leak, see our emergency roofing guide. For the common locations where roofs leak, see our common roof leak sources guide.
Why the Leak Is Rarely Above the Stain
This is the single most important concept in leak detection: water does not fall straight down inside a roof assembly. A roof is built in layers — shingles, underlayment, decking, rafters — and water that penetrates the shingles travels along these layers, following gravity and surface tension, often running horizontally for feet before it drips into the attic or living space.
How Water Travels Inside a Roof
- Water enters through a gap — a missing shingle, failed flashing, cracked vent boot, or damaged valley.
- It hits the underlayment — the water-resistant layer beneath the shingles. Water runs down the underlayment following the roof slope.
- It reaches a seam, fastener, or decking gap — and penetrates to the underside of the deck.
- It runs along the underside of the deck or along a rafter — following the wood grain, surface tension, and gravity.
- It drips into the attic or onto insulation — and eventually appears on the ceiling below, potentially several feet from the original entry point.
This is why a ceiling stain in the center of a room may originate from a flashing failure near the edge of the roof, or from a plumbing vent boot located yards away.
Step 1: Locate the Interior Stain and Measure Its Position
Before going into the attic, identify where the water is appearing inside the home:
- Note the exact location** of the ceiling stain, bubbling paint, or dripping water.
- Measure from two fixed reference points** — typically the distance from the nearest exterior wall and the nearest side wall. You will use these measurements to find the corresponding spot in the attic.
- Note when it leaks** — does it leak during rain, after rain, only during wind-driven rain, or only when snow is melting? Wind-driven rain suggests a flashing or seal issue; leaks that appear after rain stops may indicate water pooling or slow drainage.
Step 2: Go Into the Attic with a Flashlight
The attic is where you will find the actual entry point. The NRCA recommends homeowners avoid walking on the roof itself — the attic is safer and often more revealing.
Safety first:
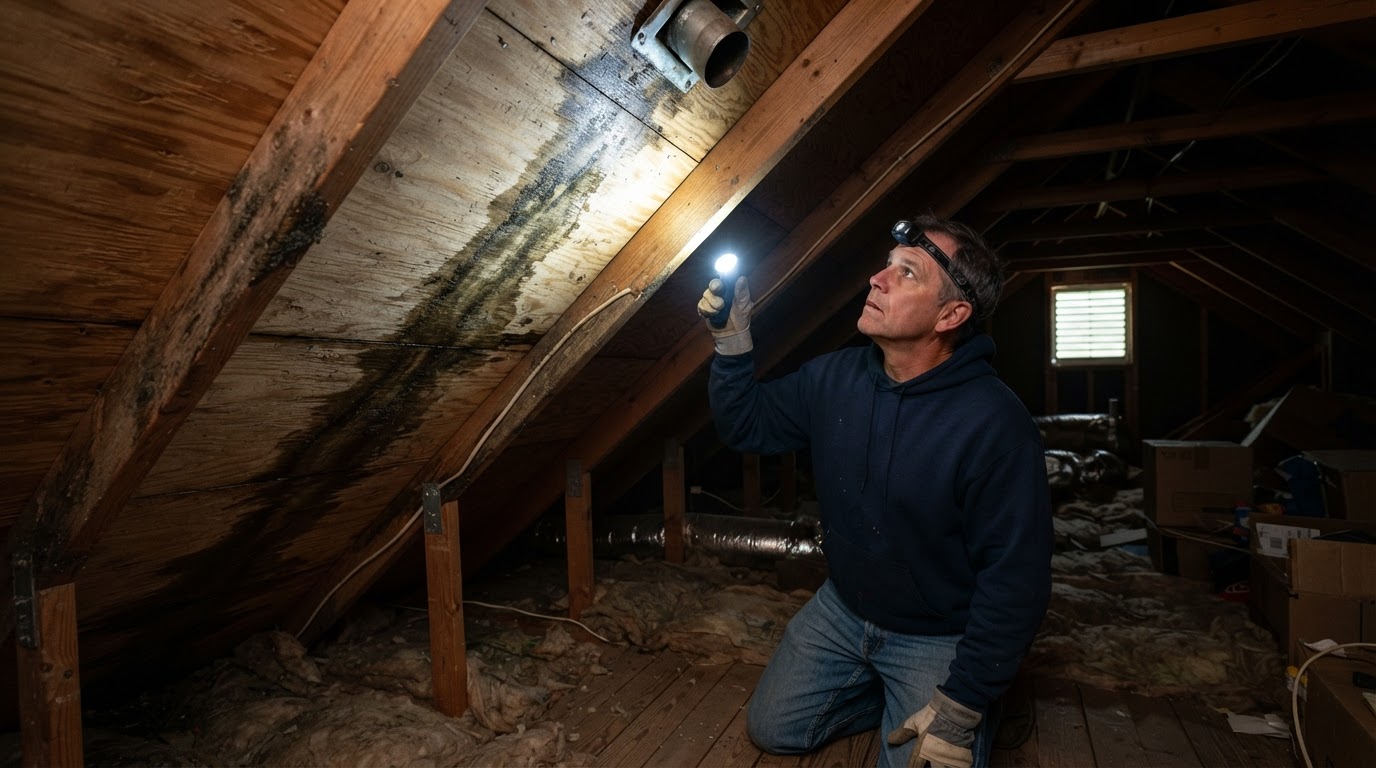
- Step only on ceiling joists or a walkway — never on the insulation or the drywall ceiling below, which will not support your weight.
- Bring a bright flashlight, not just a phone light.
- Wear a mask if the attic is dusty or has evidence of mold.
What to look for:
- Transfer your interior measurements — find the spot in the attic that corresponds to the ceiling stain below using your wall-distance measurements.
- Look up at the underside of the roof deck — scan for dark stains, wet wood, mold, or water trails running down rafters.
- Follow the water trail upward — water stains on the deck or rafters often form a visible path. Follow the trail to its highest point, which is typically near the entry point.
- Check during or right after rain — active dripping is the easiest way to pinpoint the source. If you cannot wait for rain, a helper can run a garden hose on the roof section above while you watch from the attic (see Step 4).
Step 3: Check the Common Leak Locations
If the attic inspection reveals the general area but not the exact entry point, focus on the most common leak locations in that area. These are the components where roofs most frequently fail:
Plumbing Vent Boots
The rubber or neoprene boot around plumbing vent pipes is one of the most common leak sources. The boot degrades from UV exposure, cracks, and allows water to run down the pipe into the attic. Look for cracked, lifted, or dried-out boots. See our common roof leak sources guide for details.
Flashing Around Chimneys, Walls, and Skylights
Flashing is the metal or membrane that seals joints where the roof meets a vertical surface. Failed, rusted, or improperly installed flashing is a leading cause of leaks. Look for:
- Rusted or corroded metal flashing.
- Flashing that has pulled away from the chimney or wall.
- Cracked or dried sealant at flashing edges.
For flashing-specific guidance, see our roof flashing and chimney guide.
Roof Valleys
Valleys — the internal angles where two roof planes meet — carry the highest volume of water and are common leak points. Look for worn shingles, debris accumulation, or rusted valley metal in the area above your attic stain.
Skylights
Skylights are a frequent leak source due to their many seams, flashing components, and sealant joints. A leak near a skylight may originate from the skylight flashing, the curb, or the sealant — not the glass itself.
Damaged or Missing Shingles
Visually obvious damage — missing, cracked, or wind-lifted shingles — can be the entry point, especially after a storm. For how to identify storm damage, see our how to identify hail damage guide and storm and hail damage guide.
Ice Dams (in Cold Climates)
In regions with winter freezing, ice dams can force water under shingles. If leaks appear only during winter or during snowmelt, an ice dam may be the cause. Proper attic ventilation and ice & water shield help prevent this. See our roof ventilation guide.
Step 4: The Hose Test (If Needed)
If you cannot find the leak during rain and the attic trail is unclear, a controlled hose test can help isolate the source:
- Have a helper on the ground with a garden hose while you are in the attic with a flashlight.
- Soak one small section of the roof at a time, starting at the bottom (eaves) and working upward.
- Wait several minutes between sections — water takes time to travel through the roof assembly.
- Watch for the first sign of dripping in the attic — the section being soaked at that moment is closest to the entry point.
- Narrow the area — once you identify the general section, soak smaller sub-areas to pinpoint the exact component.
Caution: Do not spray water at high pressure or directly into vents or gaps — this can create artificial leaks that do not reflect normal rain behavior. Use a gentle, rain-like spray.
Step 5: Document and Call a Professional
Once you have identified the general area and likely component, document what you found:
- Photograph the attic stain or active drip.**
- Note the measurements and the suspected entry component** (vent boot, flashing, valley, etc.).
- Note when the leak occurs** (during rain, wind-driven, after rain, winter).
This information helps a roofing professional confirm the source quickly and propose the right repair — saving time and reducing the cost of diagnosis. For how to choose a qualified contractor, see our how to choose a roofing contractor guide.
When to Stop and Call a Professional Immediately
Stop your own investigation and call a professional if:
- The leak is active and significant** — water is running or pooling, not just a slow stain. See our emergency roofing guide.
- The roof deck is sagging or soft** — a structural problem that is dangerous and beyond DIY.
- There is mold growth** in the attic — mold indicates long-term moisture and may require professional remediation.
- The leak is near electrical wiring or fixtures** — water and electricity are a hazardous combination.
- You cannot safely access the attic** — fall risk is real; do not attempt inspection you cannot do safely.
- Multiple leaks are appearing** — widespread leaking suggests a systemic problem, not a single isolated component.
Leak Detection Checklist
Use this checklist to systematically trace a leak:
- [ ] Locate and measure the interior stain from two walls
- [ ] Note when the leak occurs (rain, wind, after rain, snowmelt)
- [ ] Enter the attic safely (step only on joists, bring a bright flashlight)
- [ ] Transfer measurements to find the corresponding attic location
- [ ] Scan the underside of the deck for water trails, stains, or mold
- [ ] Follow the water trail upward to the highest point
- [ ] Check common leak components in that area (vent boots, flashing, valleys, skylights)
- [ ] If needed, run a controlled hose test with a helper
- [ ] Document findings with photos and notes
- [ ] Call a professional for repair or if the leak is active, structural, or unsafe to investigate
A Note on Sources
This guide draws on National Roofing Contractors Association (NRCA) consumer guidance on roof inspection and maintenance, Asphalt Roofing Manufacturers Association (ARMA) technical bulletins on common leak sources, and established building-science principles regarding water movement in roof assemblies. Leak diagnosis can be complex, and some leaks require professional experience and equipment to locate — this guide provides a homeowner framework, not a substitute for professional evaluation when the leak is active, structural, or difficult to isolate.
Frequently Asked Questions
Why is my roof leak not directly above the ceiling stain?
Because water does not fall straight down inside a roof assembly. Water that penetrates the shingles runs along the underlayment, then along the underside of the roof deck and rafters, following gravity and surface tension. It can travel several feet horizontally before dripping into the attic or onto the ceiling below. This is why the visible stain is often far from the actual entry point.
How do I find where my roof is leaking?
Go into the attic during or right after rain with a bright flashlight. Measure the interior stain's position from two walls, then find the corresponding spot in the attic. Look up at the underside of the roof deck for water trails, dark stains, or wet wood, and follow the trail upward to its highest point — that is typically near the entry point. Check common leak components like vent boots, flashing, and valleys in that area.
What are the most common places a roof leaks?
The most common leak locations are plumbing vent boots (which crack from UV exposure), flashing around chimneys, walls, and skylights, roof valleys where two roof planes meet, skylight seals and curbs, and damaged or missing shingles. These components have seams, joints, or sealant that degrade over time and create water entry points.
Can I use a garden hose to find a roof leak?
Yes, carefully. Have a helper soak one small section of the roof at a time with a gentle, rain-like spray while you watch the attic with a flashlight. Start at the bottom and work upward, waiting several minutes between sections. When you see the first drip, the section being soaked is closest to the entry point. Do not use high pressure or spray directly into vents or gaps, as this can create artificial leaks.
When should I stop trying to find the leak myself and call a professional?
Call a professional immediately if the leak is active and significant (running or pooling water), the roof deck is sagging or soft, there is mold growth in the attic, the leak is near electrical wiring or fixtures, you cannot safely access the attic, or multiple leaks are appearing in different areas. These situations indicate structural, safety, or systemic problems beyond DIY diagnosis.
Should I walk on my roof to find a leak?
No. The National Roofing Contractors Association recommends that homeowners avoid walking on their roofs. The risk of personal injury and of damaging aged or wet shingles outweighs the value of a closer look. Most leak detection can be done from the attic and the ground with binoculars. Leave roof-level inspection to a professional.
Cited Research Sources & References
- National Roofing Contractors Association (NRCA) — Consumer ResourcesView Source
- Asphalt Roofing Manufacturers Association (ARMA) — Technical BulletinsView Source
- U.S. Department of Energy — Homeowner Energy and Moisture ManagementView Source